Public-Observing-Unci-Maka
Observing Unci Maka
Welcome to the Observing Unci Maka repository, part of the Environmental Data Science Innovation and Impact Lab (ESIIL) at CU Boulder. This repository serves as the central hub for our working group, hosting our project description, member bios, codebase, and more.
Our Project
This working group brings together Tribal members, scientists, students and NASA remote sensing researchers to formulate new methods of using existing earth observation data to identify, monitor, and address environmental injustices in Tribal communities. We have two in-person meetings that we are using to gather preliminary insights to how NASA datasets could be used to address important socio-environmental issues near Tribally-managed lands as well as landscapes that sustain cultural resources that are important for Indigenous Ways of Being and Knowing.
Project Proposal
Project Deliverables - Updated May 2026
Group Members
Sylvie Alexander
Shannon Boldt
Max Cook
Summer Dupree
Ayia Lindquist
Betty Poley
Bob Rabin
Darryl Reano, Co-Investigator (Indigenous Data Sovereignty). Website
Cynthia Sanders
Jim Sanovia
Shawn Serbin
Vanessa Taho
Gabriel Talayumptewa
Joni Tobacco
Sam Toledo
Elisha Yellow Thunder
Meeting Notes and Agendas
Contributing to This Repository
We welcome contributions from all group members. To maintain the quality and integrity of the repository, please adhere to the following guidelines:
- Make sure all commits have a clear and concise message.
- Document any major changes or decisions in the meeting notes.
- Review and merge changes through pull requests to ensure oversight.
Observing Unci Maka
A repository for the development of code and workflows for the Observing Unci Maka ESIIL working group.
Instructions for setting up local Python environment and Git commands (from Max)
Instructions adapted from Earth Data Science.org
- Installing Python on your personal computer from miniconda
Note: if you already have Python installed you may skip ahead to #3
- Download the correct (e.g., Windows, MacOS, or Linux) miniconda from: https://docs.anaconda.com/miniconda/
- Run the installer (Windows)
Run the installer by double-clicking on the downloaded file and follow the steps below.
- Click “Run”.
- Click on “Next”.
- Click on “I agree”.
- Leave the selection on “Just me” and click on “Next”.
- Click on “Next”.
- Select the first option for “Add Anaconda to my PATH environment variable” and also leave the selection on “Register Anaconda as my default Python 3.7”. Click on “Install”.
Note that even though the installation is for Miniconda, the installer uses the word Anaconda in these options. You will also see a message in red text that selecting “Add Anaconda to my PATH environment variable” is not recommended; continue with this selection to make using conda easier in Git Bash.
- When the install is complete, Click on “Next”.
- Click on “Finish”.
- Run the installer (MacOS)
- Download the installer: Miniconda installer for Mac. Be sure to download the Python 3.x version!
- In your Terminal window, run: bash Miniconda3-latest-MacOSX-x86_64.sh.
- Follow the prompts on the installer screens.
- If you are unsure about any setting, accept the defaults. You can change them later.
- To make sure that the changes take effect, close and then re-open your Terminal window.
- Installing Git and Bash (for interacting with GitHub)
Windows
- Download the Git Installer for Windows
Run the installer by double-clicking on the downloaded file and by following the steps below:
- Click on “Run”.
- Click on “Next”.
- Click on “Next”.
- Click on “Next”.
- Click on “Next”.
- Click on “Next”.
- Leave the selection on “Git from the command line and also from 3rd party software” and click on “Next”.
- Click on “Next”.
- Leave the selection on “Checkout Windows-style, commit Unix-style line endings” and click on “Next”.
- Select the second option for Use Windows’ default console window and click on “Next”.
- Click on “Next”.
- Click on “Install”.
- When the install is complete, click on “Finish”.
This installation will provide you with both Git and Bash within the Git Bash program.
- Download the Git Installer for Windows
-
Install Git and Bash for MacOS
The default shell in all versions of Mac OS X is Bash, so no need to install anything. You access Bash from the Terminal (found in /Applications/Utilities).
- Install Git for MacOS:
- Follow instructions for installing Git for MacOS
- Install Git for MacOS:
More instructions for what Bash is and how to use it can be found on the EarthDataScience.org tutorial
- Clone the repository to your local machine and setup the Python environment\
Cloning the repository essentially sets up a folder on your local machine that is a copy of the GitHub repository. Any changes you make in this folder (i.e., writing new code) can be “pushed” to the GitHub repository for all to see.
Note: Further instructions for cloning repositories can be found at this link
- Option #1: GitHub Desktop
Note: I (Max here) like using GitHub Desktop because it is straightforward and requires less from the terminal. However, both of the below options are good
- Download and install GitHub Desktop
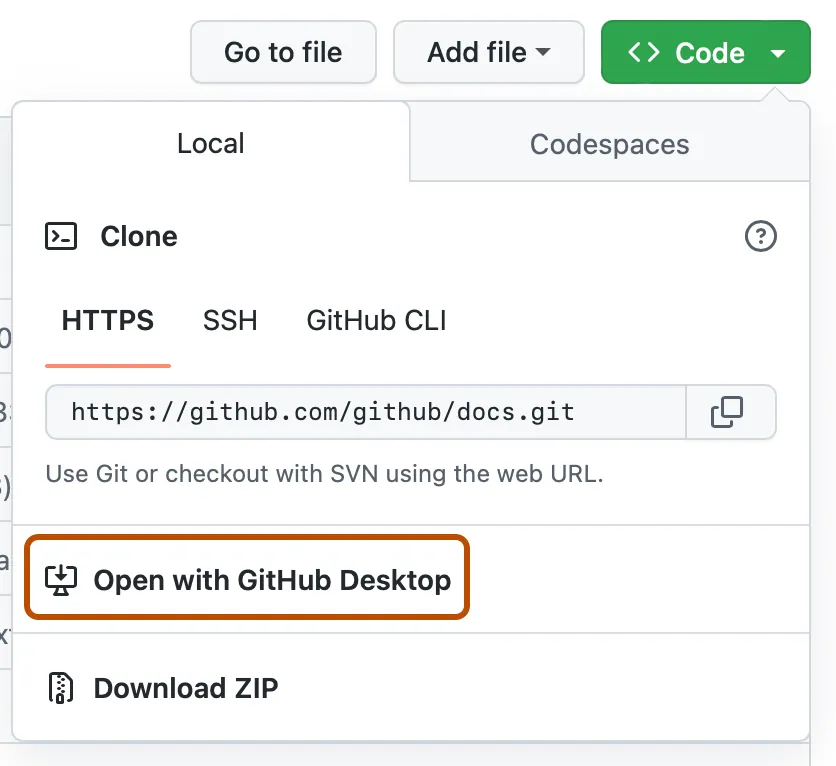
- In the main repository on GitHub, find the repo URL:

- Clone and open the repository with GitHub Desktop, click Open with GitHub Desktop
 \
\
- Option #2: Use Git commands in the terminal (or Bash for Windows)
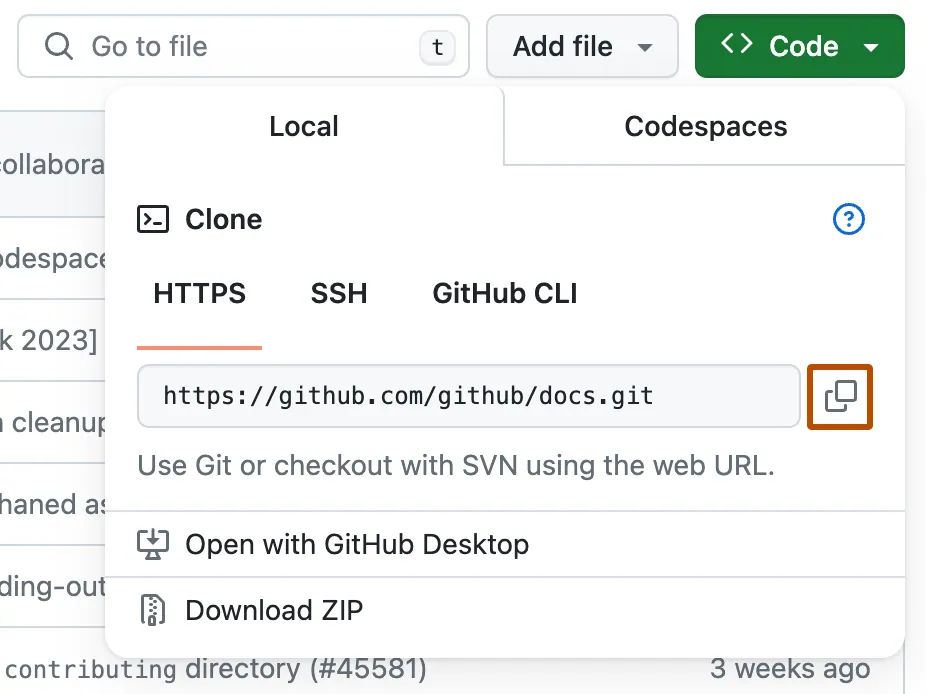
- In the main repository on GitHub, find the repo URL:
- Copy the HTTPS url:
- In your terminal (or Bash for Windows):
cd <path-to-local-directory>
git clone <repository url>
- In the main repository on GitHub, find the repo URL:
- Install/setup the Python environment
For our work, we have a “.yaml” file, which is a Python environment file that can be used to install all the dependencies we will need for coding. Updates to this file with new packages, etc., allows us to keep a consistent environment for everyone working on the project. You may have to periodically reinstall the environment as we make changes (adding new packages).
** To setup the environment for the first time:**
- Open terminal (or Bash for Windows)
- Change directory into the GitHub repository we cloned above
cd <path-to-local-repo> - Using Bash command to print the contents of the directory:
lsYou should see the list of files, etc., in the repo including our “py-unci-maka.yaml”
- Create a new Python environment using the “.yaml” file
conda env create --file=py-unci-maka.yaml - Activate the new Python env:
conda activate py-unci-maka - Now, we can setup JupyterLab so you can create your own notebooks or access ones already in the GitHub:
- First, register our Python env with ipykernel so it is accessible in JupyterLab
python -m ipykernel install --user --name=py-unci-maka - Now, you can open a new JupyterLab session by typing:
jupyter-labNote: this will open JupyterLab in your default browser window. When you start a JupyterLab, make sure you ‘cd’ (change directory) into the GitHub repo you cloned on your local machine. This will ensure you have easy access to all the files and code in the repository.
- First, register our Python env with ipykernel so it is accessible in JupyterLab
*To update your ‘py-unci-maka’ environment:*
Note: These steps are for updating the environment you’ve created. As we develop code, we will periodically be updating the “.yaml” file with new Python packages. To update the conda environment, or to make sure you are using the most recent version, follow these steps…
- Make sure the GitHub repository is up to date:
- If using GitHub Desktop:
- Open GitHub Desktop
- Make sure your in the correct repository (“observing-Unci-Maka”)
- In the top right, click “Pull”

Note: this action makes sure that the repository on your local machine is the most up-to-date. For example, if others have made changes to the rpeository since you last worked on it, these changes will be visible once you “pull” them. Similarly, you can “Push” changes to the repository when you have made edits on your local machine.
- If using Terminal/Bash
- First, create a personal access token following these instructions
- Open Terminal/Bash
- Change directory into the local GitHub repository (where you cloned it on your machine)
cd <path-to-local-repo>- Check the origin. When prompted, enter your GitHub username and then copy and paste the Personal Access Token for your password
git remote -v git fetch origin- Pull the latest version of the repository
git pull- Now, you can update your conda environment in terminal/bash:
  conda activate py-unci-maka
  conda env update --file py-unci-maka.yaml --prune
*To push local changes to GitHub:*
How to Update the Website
The website is built from the docs/ folder. Every time you change a file there, the website updates automatically.
Step by Step
- In the repository, click the docs/ folder.
- Click on index.md. This is the home page of your website.
- In the top right, click the pencil icon (✏️) to edit.
- Change the text to describe your project (for example, add your team’s name and a short description of what you’re studying).
- Scroll down. In the Commit changes box, write a short message like updated homepage with project info.
- Click Commit changes. That’s it! In about a minute, refresh the website link and you’ll see your changes.
Common Tasks
Add a new webpage:
Create a new .md file inside docs/ (like methods.md). It will become a new page on your site.
Add a picture:
Put the file in docs/assets/ and add it to a page with  .
.
Instructions for working in CyVerse
- Login to CyVerse if you have an account, or email maxwell.cook@colorado.edu for access
————————————– Hope this Helped! ————————— ————————————————– —————————————– ————————————————————- ————————————————
Code Repository
This section of the repository will include all the code developed for the project. You can structure it as follows:
- Analysis Code: Scripts for data analysis, statistical modeling, etc.
- Data Processing: Scripts for cleaning, merging, and managing datasets.
- Visualization: Code for creating figures, charts, and interactive visualizations.
————————————– Hope this Helped! ————————— ————————————————– —————————————– ————————————————————- ————————————————
Getting Help
If you encounter any issues or have questions about how to contribute, please refer to the ESIIL Support Page or contact the repository maintainers directly.
Customize Your Repository
As a new working group, you’ll want to make this repository your own. Here’s how to get started:
-
Edit This Readme: Replace the placeholder content with information about your specific project. Ensure that the introduction, project overview, and objectives clearly reflect your group’s research focus.
-
Update Group Member Bios: Add details about each group member’s expertise, role in the project, and professional background. Include links to personal or professional web pages to foster community engagement and collaboration.
-
Organize Your Code: Structure your codebase in a way that is logical and accessible. Use directories and clear naming conventions to make it easy for all members to find and contribute to different parts of the project.
-
Document Your Data: Include a data directory with README files explaining the datasets, sources, and any preprocessing steps. This will help new members understand and work with the project’s data effectively.
-
Outline Your Methods: Create a detailed METHODS.md file where you describe the methodologies, software, and tools you will be using in your research. This transparency will support reproducibility and collaborative development.
-
Set Up Project Management: Utilize the ‘Issues’ and ‘Projects’ features on GitHub to track tasks, discuss ideas, and manage your workflow. This can help in maintaining a clear view of progress and priorities.
-
Add a License: Choose and include an appropriate open-source license for your project, ensuring that the broader community understands how they can use and contribute to your work.
-
Create Contribution Guidelines: Establish a CONTRIBUTING.md file with instructions for members on how to propose changes, submit issues, and contribute code.
-
HI SHANNON!!!
-
Review and Merge Workflow: Decide on a workflow for reviewing and merging changes. Will you use branch protection? Who will have merge privileges? Document this process to avoid confusion.
-
Establish Communication Channels: Beyond GitHub, set up additional communication channels like Slack, Discord, or email lists for quick and informal discussions.
Remember, the goal is to make your repository clear, accessible, and useful for all current and future members of your working group. Happy researching!